MAP AND COMPASS NAVIGATION
IMPORTANCE OF MAP AND COMPASS
So much of our navigation these days is done through our phones. There are apps like Trailforks that can tell us exactly where we are on the trail and make navigating outdoors way easier. What happens when our cell phone dies or we are having issues having our GPS locate us on the trail? Having a basic understanding of how to use a map and compass will be our best option for finding out where we are on the map and planning a route to our destination. There are a few things that we need to know before we can utilize this timeless tool to its full potential.
Our goal is to provide you with the basic information to understand what is on our map, how to orient the map so it’s aligned with the terrain you see in front of you, find out where you are, and be able to plan a route back to your destination. We will be covering the anatomy of a map and compass, steps to orient the map, and how to identify landmarks and terrain that will help you find out where you are and plan your route back.
MAP ANATOMY
To navigate with a map and compass will need to understand the anatomy of a map so we can benefit from all it has to offer.
TITLE – Describes what the map is showing in a broad sense. For example, the map we are working with is titled Sedona Singletrack, made by Beartooth Publishing. This is a specific map for the mountain bike trails in Sedona, AZ. The title of a map will help us pick one that is most suitable for the guided ride that we are leading.
LEGEND – Provides us with an explanation of the symbols we see on the map. Some common symbols we will see are trails with their intended use, points of interest, trailheads, peaks, color shading to show different climates or biomes, and many more. The information included in the legend is specific to the map you are using.
SCALE – Maps are a scaled-down representation of an area. Knowing the scale allows us to interpret distances that we see on the map and bring that into our route planning. This can appear in a number of different forms, it’s most commonly shown in graphic or numerical form. Our map has a scale of 1:20,000, meaning 1 unit of measurement on the map will equal 20,000 units of that same measurement in the real world. Ex 1 inch on the map equals 20,000 inches (1666 ft) in the real world The larger area that is covered by the map, the larger the scale will be. A small-scale map will not cover as much area but can have more specific information about the area. Smaller scale maps that show just the area you are guiding can be beneficial for this reason.
ORIENTATION INDICATOR – This is commonly referred to as a compass rose. This shows which direction is North on the map. Maps are very often designed in a way that the top of the map faces North.
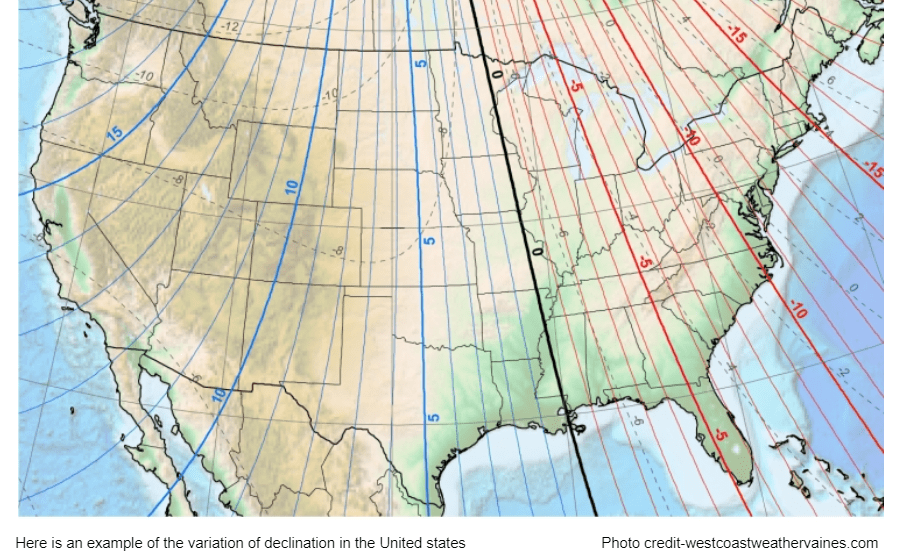
DECLINATION- Depending on where we are in the world, the location of magnetic north (where our compasses point) is not always directly in line with true north. Declination is the difference in degrees between true north and magnetic north for the area on your map. This is measured in degrees East or West. Accounting for this will become important when it comes to orienting, route finding, and locating yourself on a map.
DATE – It is important to look at the date that a map was made because the land, trails, and points of interest change over time. If we are using an overly outdated map we may not have the most current information about the area.
GRIDS – Grid lines are common to find on maps and can help to break the map into smaller pieces. There are a couple of different types of systems that are commonly used; Latitude and Longitude and Universal Transverse Mercator (UTM). Latitude lines run east-west, parallel to the equator, and are measured in degrees 0-90 north or south of the equator. Longitude lines run north and south through the poles and are measured in degrees 0-180 east or west of the Prime Meridian. The map that we are working with uses a grid determined by the Universal Transverse Mercator (UTM). This system functions just as well for locating a point on the map. Some navigators will prefer one method over the other but the most important thing is to know which system your map is using. Each grid line on our map represents 1,000 meters in the real world.
ANATOMY OF YOUR COMPASS
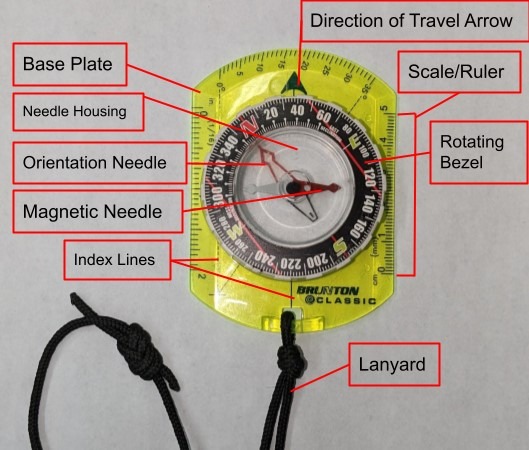
Knowing the anatomy of a compass will be essential to understanding the concepts that follow. There is a diverse array of compasses on the market but the parts listed below are commonly found on all of them.
BASEPLATE – This is the main piece of the compass and has a number of different tools on it including straight edges, rulers, index lines, and other features depending on your compass.
DIRECTION OF TRAVEL ARROW – This is an arrow that we will use to determine the direction we want to go. We will also use this to take bearings in the field.
SCALES/RULERS – On the edges of the baseplate we will have rulers that when used in tandem with the scale of the map, can help us determine distances and assist with route planning.
NEEDLE HOUSING – The part of the compass that includes the magnetic needle, orienting needle, and rotating bezel. This may be filled with water or air.
MAGNETIC NEEDLE – The red and white needle that points towards magnetic north with the red half.
ROTATING BEZEL – Rotating feature on the compass that includes the cardinal directions and degrees 0-360. It will be used for orienting the map, taking a bearing, and following a bearing.
ORIENTING NEEDLE – This is the red outline of a needle that moves with the bezel. This is commonly referred to as the shed.
INDEX LINE –Lines on the baseplate that we can line up with grid lines on the map.
LANYARD- Loop of rope that can be used to keep the compass around your neck
UNDERSTANDING TOPOGRAPHIC MAPS
An ideal map will not only provide information about trails and distance but will also show us a representation of changes in elevation. Maps with this information are Topographic maps. Being able to interpret what we are seeing will help us identify landmarks, understand what is coming up on the trail, and help us manage the expectations of our clients.
In this section, we will be discussing contour lines, intervals and specific types of terrain present themselves on topographic maps.
CONTOUR LINES – When looking at a topographic map we see lines that will help us identify the elevation at a specific point. These contour lines show the same elevation along the entire length of that specific line. When we are crossing over the contour lines we are either gaining or losing elevation. There are two types of contour lines; Index and intermediate lines. Index contour lines will be thicker and often have the elevation listed somewhere along that line. Intermediate contour lines are found in between the index lines. Typically, there are four intermediate lines between each index line. These are thinner and don’t always have the elevation labeled on them. We can determine that elevation on intermediate lines by knowing the Contour Interval for our map.
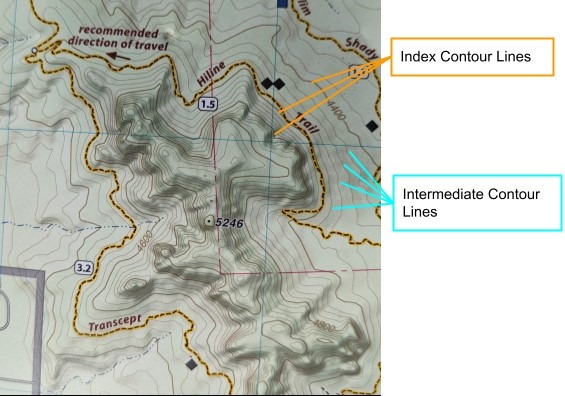
CONTOUR INTERVALS – The contour interval for a map determines the elevation change between the contour lines and is specific to the map that you are using. The contour interval can be found in the legend of our map. The map that we are working with uses a contour interval of 40 feet. So every contour line represents a 40-foot change in elevation.
By examining the contour lines we can start to piece together an idea of what the terrain will look like on our ride.
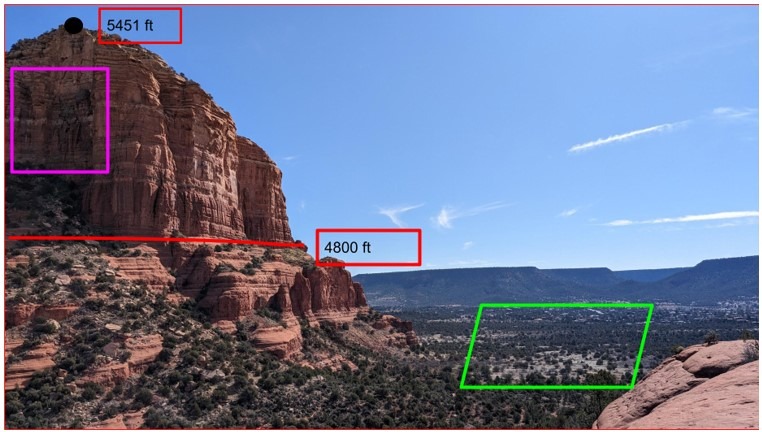
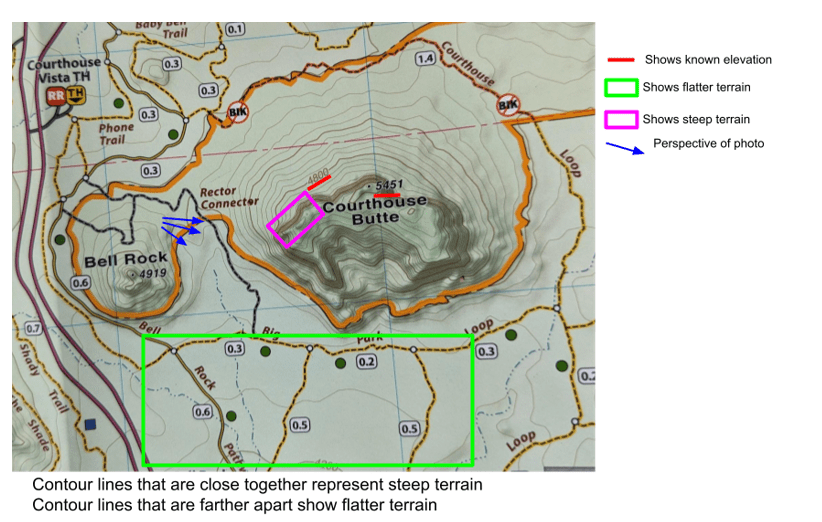
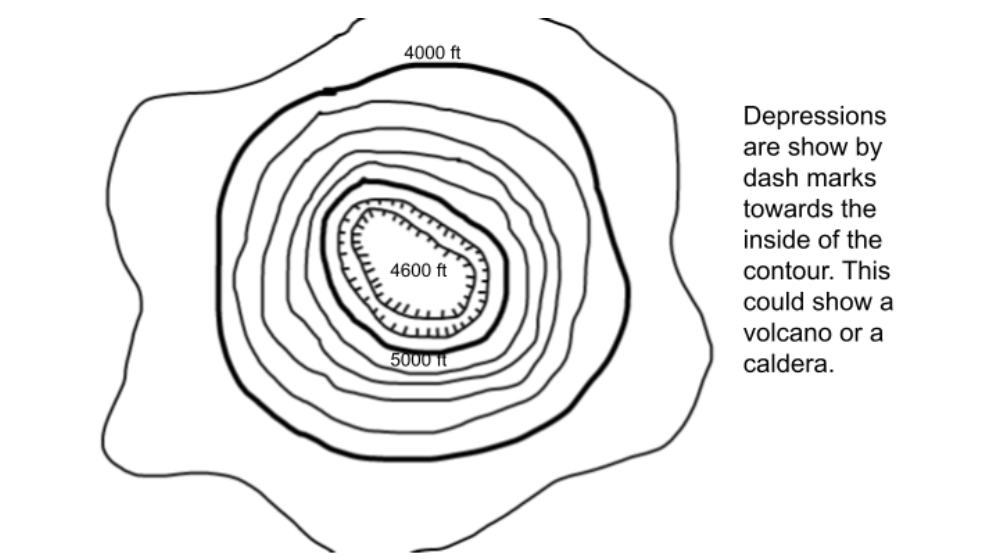
There are a number of features that commonly occur on topographic maps that we will want to easily identify. Here are examples of steep terrain, flatter terrain, peaks, saddles, valleys, and depressions.
STEEP AND FLAT TERRAIN
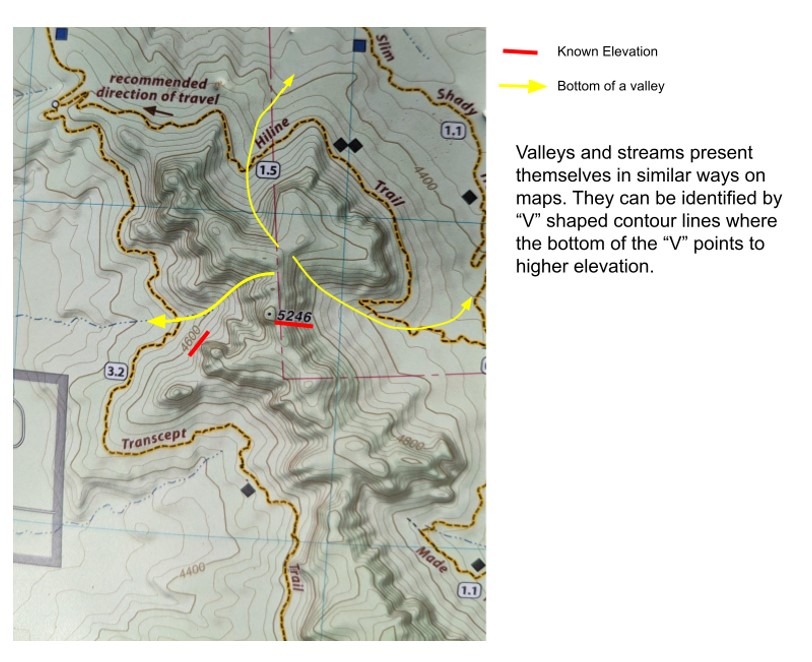
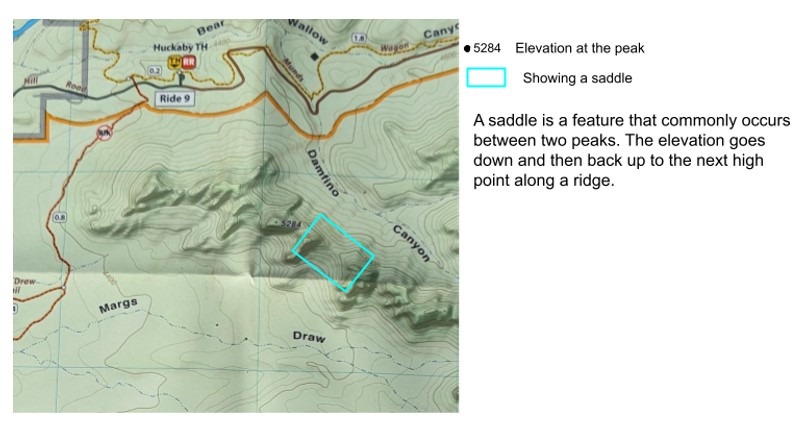
DEPRESSION
ORIENTING A MAP
Orienting a map is the first step to planning your route or locating where you are on the map. By orienting the map we can make sure the map is facing the same direction as the land. This will help us identify landmarks that we are seeing and will start us off on the right track. We will first discuss this process in its most basic form and add accounting for declination after.
Steps for Orienting a Map
- Set the bezel to 0 degrees.
- Place the compass on the map with the direction of the travel arrow directly over one of the North/South Gridlines.
- Put Red in the Shed. While holding the compass level, turn your body with the map and compass until the red part of the magnetic needle is in the orientation arrow (shed).
ACCOUNTING FOR DECLINATION
Declination is the measurement in degrees, east or west, that true north varies from magnetic north in your area. Due to the movement of tectonic plates and shifting magnetic fields, this measurement can change over time. Determining the declination for your area can be found in the legend. Our declination can either be positive or negative. An example of positive declination is magnetic north being east of true north, like in the western United States. If this is the case, we will subtract the indicated declination measurement to our bezel. Negative declination is present when magnetic north is west of true north, like in the eastern United States. If this is the case, we will add the declination measure to our bezel to account for this difference. The map that we are working with shows that magnetic north is 10 degrees east of true north, meaning we will add 10 degrees to the bezel.
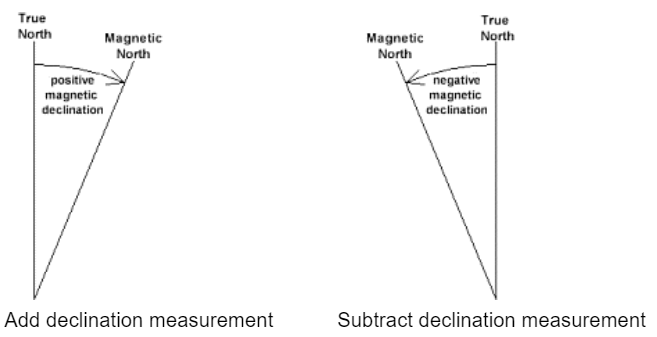
After accounting for declination we can move to orienting the map. The process will be the same as listed above.
Updated declination for your area can also be found online if it is not indicated on your map or you are working with an old map.
FINDING WHERE YOU ARE ON A MAP
Being able to find where you are on a map is incredibly important when it comes to route planning. In this section, we will cover taking a bearing from a landmark and Triangulation.
TAKING A BEARING
A bearing is a measurement in degrees from where we are in relation to North to a specific landmark or destination. To take a bearing, we will point our direction of travel arrow at an identifiable landmark (mountain, a peninsula on a lake, a point of interest, etc.) and rotate the bezel until the red magnetic needle is inside the orientation needle. Make sure to add or subtract degrees based on the declination in your area. The number of degrees that align with the direction of travel arrow will be your bearing.
TRIANGULATION
The process that you use to find where you are on a map is triangulation. This is done by taking multiple bearings from landmarks and transferring those to a map. If you are on a defined trail or on a river, you may be able to find where you are on that trail with a single bearing, but the results will be more accurate with 2-3 different bearings.
STEPS FOR TRIANGULATION
- Orient the map, accounting for declination.
- Bring the bearing you have already taken to the map by putting your pen or pencil on the landmark that you took your bearing from and set your compass against the pencil. Then, rotate the compass, keeping it resting against your pencil until the red needle is in the orientation needle (red in the shed), and draw a line along the edge of the compass extending into the distance.
- Repeat step 2 for your second and third landmarks.
- This will leave us with 2 or 3 lines that intersect at a point on the map. This intersection is where we are.
This process requires practice and can be difficult depending on where you are in the world. This process requires finding identifiable landmarks. If you are in an area that has thick tree growth or in a low-lying area, you may need to hike up to a high spot to see landmarks in the distance.
ROUTE FINDING
After finding yourself on the map, you will need to plan a route to your destination. There are a few things to bear in mind when finding your route.
- Following a bearing
After having taken a bearing to a landmark, we may be able to follow the compass in that direction while keeping the magnetic needle in the orientation needle. A good practice is to pick out a specific point, like a tree or boulder along that bearing, that you can walk to. When you get there, you can use your compass again to see the bearing and pick out another feature to walk to next.
- Inspect the terrain.
We will be looking for a low-risk and efficient route to our destination. Pay close attention to the topographic lines. Understanding the topography of an area can help make sure you stay away from terrain that is too steep to safely climb or descend. If you are dealing with large changes in elevation, it can be helpful to follow contours. Following contours can limit the physical effort required to travel. Instead of walking/riding down a valley and back up the other side, we may be able to hike around the inside of it. This may add distance depending on the circumstance, so assess your options and choose the best for your group.
- Identify landmarks that you are expecting to see on your route.
Along your intended route, there will be a variety of landmarks. Ex we will be traveling for about 1 mile then we will hit a stream. When we get to the stream, we will cross and head up to the peak and descend down the least steep portion of the mountain on the eastern side, where we will hit the trail and follow that to the parking lot.
- Use all of the information on your map.
We will have a ton of information on maps, and very often, those include trails and roads. Travel will be easier on trails compared to making a new path. Try navigating to a trail first, then to your final destination.
- Identify backstops.
Backstops are features along that route that, if we hit them, we know we went too far. For example: if we get to the lake, we went too far. Knowing the features around where you do not want to go will help you from getting too far down the wrong path.
PUT IT ALL TOGETHER
Humans have been navigating the globe with a map and compass for hundreds of years. The skills we have discussed will require practice and repetition to hone but will add confidence and opportunity to your guiding. We have discussed the information that a map can provide us with, the parts of a compass, and understanding how to identify landmarks through topographic contour lines. We took the understanding of the anatomy of a map and compass to the next level by orienting the map, accounting for declination, and finding where we are on the map through triangulation. All of these skills will be utilized when we are planning a safe route to our destination. Bring a map and compass on your next ride and practice applying these skills!
