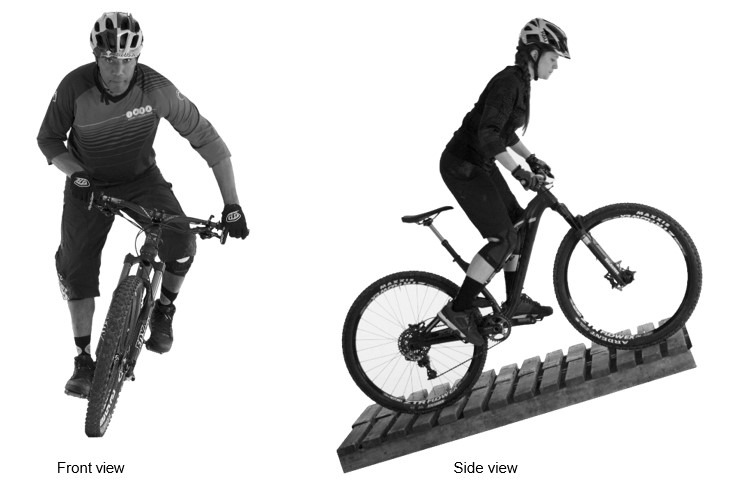
STANDING CLIMB – Wiegetritt
The Standing Climb is a powerful technique that consumes more energy from the quadriceps and upper body.
WHERE IT IS USED
The Standing Climb technique is used on short, steep climbs that are not overly technical or loose. The Standing Climb is also used as a break during a long-seated climb, to stretch the muscles, or to burst over the crest of a hill.
KEYWORDS – STANDING CLIMB
| 1. Shift Gears. 2. Stand Up. 3. Power Pedal (Rocking). 4. Pull. 5. Continue. |
INSTRUCTOR DEMONSTRATION
Front view. Jogging pace.
PERFORM A DEMONSTRATION – The instructor must perform a demonstration for each progression.
LOCATION FOR DEMONSTRATION
Dirt, non-technical climb with a short steep grade.
SITE SELECTION – Choose a location that will allow you to teach Seated, Standing, and Crouched Climbing. The Climbing skills are best taught as progressions of each other.
GOAL OF THE LESSON
To develop good timing and coordination, when rocking the bike from side to side, while standing to power for the climb.
KEYWORDS – The describing words used to teach the skill.
PHASE BREAKDOWN – Help the instructor create a deeper understanding of the skill, how it is broken down into the key Bike/Body movements, and the correct order they should be performed.
| THREE PHASE | KEYWORDS STANDING CLIMB | THE KEY BIKE/BODY MOVEMENTS TEACHING POINTS |
|---|---|---|
| Set Up | Shift Gears | The rider Shifts Gears to the appropriate gear, before entering the climb. Eyes scanning ahead to choose the riding line. Speed: Jogging pace. |
| The Move | Stand Up Power Pedal (Rocking) Pull | The rider Stands Up. The rider uses a Power Pedal on each down stroke. Making a slight shift in weight towards the rear of the bike during a power pedal phase of each pedal stroke, adding weight and traction to the rear wheel. The bike Rocks from side to side and the body remains still. Simultaneously, The rider Pulls up on the handlebar with one arm as the same leg powers down on the pedal. The wheels must track together along the same line. |
| Follow Through | Continue | The rider Continues pedaling. As the climb subsides the rider maintains a balanced position by bringing the upper body up and back into a more upright seated position. |
Additional information:
To help the riders understand the rocking motion, have them practice arm and grip movements. As the bike rocks left, the left-hand pinky and ring fingers loosen their grip while the right-hand pinky and ring finger tighten their hold. “Pull with your right hand at the same time your right leg powers down on the stroke”.
GROUP MANAGEMENT – Have the riders come through one at a time. Instruct the group to wait off to the side at the top of the climb of each section, until the last rider has come through, before giving further instructions.
METHOD OF OBSERVATION – Watch the riders from the top of the climb using a (front view). Looking for the side-to-side rocking as the rider is powering through the short section of trail.
ERROR DETECTION AND CORRECTION – Positive – Constructive – Positive.
ERROR DETECTION AND CORRECTION
Example: Bike is swerving from side to side.
- Check the timing of the pull on the handlebar. Correct timing is needed to rock the bike. If the bike does not rock, the rider will swerve and attempt to maintain control by moving their upper body.
- The force of the pull from each side of the handlebar should match.
Example: Rear wheel loses traction.
- Have the rider use a power pedal on each down stroke, while making a slight shift in weight towards the rear of the bike to add traction to the rear wheel.
- If the rider is in too easy of a gear, they may lose traction on the down stroke.
PROGRESSIONS– Help teach the skill in smaller steps to ensure the rider is proficient in that step before advancing to the next step in the skill lesson.
RIDE STANDARD – The BICP ride standard is used for testing riders for certification.
SKILL PROGRESSIONS
Ensure the riders know how to dismount on a climb before practicing the climbing skills.
PROGRESSION ONE
The riders practice the Standing Climb, the rocking technique, on a Green-Blue climb with no technical difficulty.
PROGRESSION TWO (RIDE STANDARD)
Move to steeper terrain. Have the riders practice the Standing Climb, on a Blue-Moderate climb with a short steep grade, using a power pedal on each down stroke, while making a slight shift in weight towards the rear of the bike to add traction to the rear wheel.
PROGRESSION THREE
Add shifting during the climb. The riders practice Standing Climb, on a Blue-Moderate climb, shifting into an easier gear as reach the crest of the hill.
WRAP UP THE LESSON – Remind the riders of their accomplishments and suggest ways they can continue to practice and progress the skill.

